Table of contents
Version française
Introduction
Linux example
Cisco IOS example
FreeBSD example
Links
Introduction
In networking, routing usually depends on destination IP addresses (default, routing protocol or static route). PBR allows to route traffic according to any element (source address, ToS, protocol, port, …). The most common reason to implement Policy Routing is a need for source routing and will documented here, using Linux advanced routing capabilities, Cisco IOS and FreeBSD.
Warning! PBR can cause severe damages on your network, such as bringing it down or overloading your routers. I will not be responsible if you are trying to implement Policy Routing on a live network; you’ll have to assume the risks. Always make sure you can connect to the console of your equipment to reverse your changes in case of failure.
At work, I had to route some traffic from a server to different satellite transponders according to the source IP address involved, thus I implemented PBR on the Linux server in order to route traffic to the correct satellite modulator. This option saved two NNTP servers and the design of any mechanism of data synchronization between them (news feed). Additional complexity due to failover and specific needs has been removed from this example.
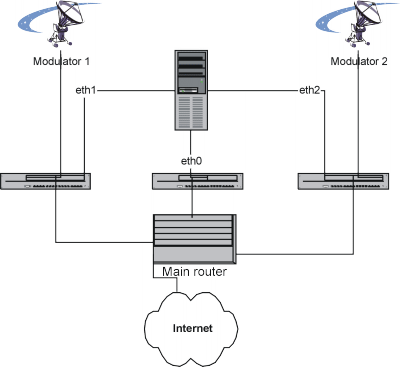
First of all, to understand the used commands, we have to define an IP address on every interface used.
- eth0 : 192.168.0.3
- eth1 : 192.168.1.3
- eth2 : 192.168.2.3
- main router on eth0 : 192.168.0.1
- Modulator 1 : 192.168.1.2
- Modulator 2 : 192.168.2.2
This server needs to talk to clients over satellite and will communicate with its feeders over the LAN. The default routing goes to the main router on the interface eth0. In addition, traffic sent from the interface eth1 (192.168.1.3) will be sent to Modulator 1 (192.168.1.2) and the traffic transmitted from the interface eth2 (192.168.2.3) will be sent to Modulator 2 (192.168.2.2). These rules don’t depend on the destination IP address! This allows to different gateways for each network interface of the system.
Notions of from and to might be ambigious, but will refer according to the server, not the clients connecting to it.
Linux example
In order to setup policy routing, you need a Linux kernel running with advanced routing capabilities and policy routing enabled. You might also have to install the package iproute2 that you can find at here. Debian users can try the command apt-get install iproute. Knowledge in networking will be helpful too.
You need to setup the interface eth0 and the default route to the router:
# /sbin/ifconfig eth0 192.168.0.3 netmask 255.255.255.0 broadcast 192.168.0.255

# /sbin/route add default gw 192.168.0.1
At this point, iproute2 commands will be involved. We’re going to create a table for the first modulator (number 4) that will define any traffic coming from 192.168.1.3, then we have to set a default route (0.0.0.0/0) using 192.168.1.2 as gateway if the traffic matches tha table number 4 (from 192.168.1.3):
# ip ru add from 192.168.1.3 lookup 4

# ip ro add 0.0.0.0/0 via 192.168.1.2 table 4
At this point, traffic on the interface eth1 can be tested. Then, we are going to do the same with the interface eth2 and the second modulator, using table number 5:
# ip ru add from 192.168.2.3 lookup 5

# ip ro add 0.0.0.0/0 via 192.168.2.2 table 5
During my tests, the traceroute command bypassed the PBR rules. Also, my iproute2 has some problems showing the rules and routes; that forced me to remember the rules I entered when I wanted to remove them. I did not test recently if these “problems” have been fixed.
Also, iproute2 can be used for many things, such as QoS.
Cisco IOS
A Cisco router can be used to implement PBR, using route maps applied on the involved network interface(s).
Implementing Policy Routing on a Cisco router will have some secondary effects on the device, such as a higher CPU load. It can also conflict with route caching which ought to be disabled. Last but not least, it can cause headaches, especially in an environment using a routing protocol. Be careful!
The network design is a bit different from the Linux example. The different addresses will be on the same IP network (192.168.0.2, 192.168.0.3 and 194.168.0.4/24) and will be connected to the Interface FastEthernet 0/0 on the router. The router is still connected to the 3 different subnets where the modulators are.
We want to route the traffic coming from 192.168.0.3 to 192.168.2.2 and from 192.168.0.4 to 192.168.1.2. In order to perform that task, we have to declare some IP extended access-lists that define the traffic rules (this is about the same as the table rules with Linux)
# Any traffic coming to the LAN on the router
# (avoid problems if some systems are misconfigured)

access-list 130 permit ip any 192.168.0.0 0.0.0.255

# Any traffic from 192.168.0.4 to anywhere:

access-list 131 permit ip host 192.168.0.4 any

# Any traffic from 192.168.0.3 to anywhere:

access-list 132 permit ip host 192.168.0.3 any

# Other traffic:

access-list 133 permit ip any any
Now we have to define a route-map that we will define the routing to the satellite gateways. To avoid unnecessary confusion, the used numbers are the same as in the access-lists. First, we need to define a rule described by any traffic coming to the LAN on the router should be sent on the Interface FastEthernet 0/0.
route-map satellite permit 130

 match ip address 130

 set interface FastEthernet 0/0
Then, let’s attack! We have to route all the traffic coming from 192.168.0.4 to the modulator 192.168.1.2 as number 131 and the traffic sent from 192.168.0.3 will have to be routed to 192.168.2.2 using number 132:
route-map satellite permit 131

 match ip address 131

 set ip next-hop 192.168.1.2

route-map satellite permit 132

 match ip address 132

 set ip next-hop 192.168.2.2
We ought to define the traffic with no specific policy rule:
route-map satellite permit 133

 match ip address 133
As I wrote earlier, the concept is close to the example used with Linux, only the syntax used is different. The access-list defines the table and route-map represents the action taken. This is not over because we have to enable the route-map on the dedicated interface, but now is the only chance to save the configuration if something goes wrong! Let’s enable it now:
interface FastEthernet0/0

 ip policy route-map satellite
Now the PBR is active; if your router stopped responding, something’s wrong and you’ll have to review your setup.
FreeBSD
With FreeBSD, ipfw can be used to manage policy routing if the option PFIREWALL_FORWARD is enabled in the kernel. The command syntax is ipfw add fwd address rule where rule has the same syntax as a filtering rule.
Thanks to Daniel O’Callaghan who reported a mistake and suggested an example:
# /sbin/ipfw add fwd 192.168.1.2 tcp from any to any 25
It will send all outbound mail packets via router 192.168.1.2 irrespective of the routing table.
Links
- Cisco public documentation about Policy-Based Routing
- Policy Routing in Linux, an article in SysAdmin mag.
- Policy Routing Book by Matthew G. Marsh.
- RFC 1102: Policy routing in Internet protocols
2 thoughts on “Introduction to Policy Routing”